Friday, September 28, 2012

Clean Freak


 It's Friday!  Time to prepare for your weekend!

First, lets do the check list for Friday:

 1. Write menu for the next week to prepare for shopping.

 2. Write grocery list and any other items you must buy at a store.


3.  Print out bank statements and update budget.

4.  It's the last business day of the month.  Do you have month end bills to pay?  Time to do that too.

5.  Plan when you will do tasks for the weekend including wash/clean out car, groceries, laundry, housework.  (yeah, for those of us who work full time and run a business on the side, most of these activities have to be done on a weekend.  Some of you are able to do this during the week and keep your weekends free.  In our house, it just isn't working that way right now.)

And besides that I just thought I'd share some musings on cleaning and tidying.

Are you a Clean Freak?  

 I mean really?  Think about it?  It's a very interesting subject and I am guilty of doing a lot of google searches on being a neat freak or a clean freak.

I am not. (a clean freak)

I wish I was to the healthy extent, but not in the OCD way that you find in so many articles.  I don't think anyone really wants to be so obsessive that they loose much needed sleep on a week night when they have to work in the morning, because they got upset about the pantry or a drawer and stayed up to the wee hours making it perfect.  That is a an effort to control things on the outside to make yourself feel calm on the inside.

I think the balance is in the truth that, making your life organized and orderly DOES in fact bring inner peace and it really does free you up to do the things you value, but it can become unbalanced if you let it become obsessive and then it's controlling you.

I think those of us who struggle to be orderly and tidy can learn great lessons by studying the ways of the super neat.  Such as:

1. They are highly visual people.  So much of what they do is a result of what they see in their world around them.  It comes from them saying "When I see the paper on the floor, I go pick it up."  "When I see the garbage can is full, I empty it and put a new bag in place"   or "When I see the tuft of cat hair on the carpet, I don't wait until the next time to vacuum, I just bend over and pick it up".

You see, the very orderly people in our lives have developed a habit of responding to the things they see around them.  The naturally messy types would see the cat hair and inwardly say "It's time to vacuum.  Now I have to vacuum this room.  It will have to wait until it's time to vacuum, I can't do it right now."   We can sabatoge our own efforts to get things in order by viewing things we see as large tasks to do, when a small task such as bending over to pick up the hair might suffice for now.

2. They allow time to organize and clean.  Have you ever invited someone out on a Friday night, or offered to hang out for a while after work and they just said something like "Thanks, but I'll pass, I have some things I want to get done at home and if I stay and visit, I won't accomplish what I need to."  I have had exactly that experience.  The clean types of people don't even realize sometimes that they mentally plan times when they will get certain things done.

3. Self Respect.  I know a few naturally clean people and it's part of their inner values.  They value being a good steward of the resources given to them by God.  Did God bless them with a house? a job? Clothes, books, media items, etc?  The clean types want to take care of what they own and make it nice for themselves and their family.  It is a healthy measure of self respect.

I fall in the middle.  I am hopelessly average.  I am not a slob, but I am not really a clean freak either.  I have some quirks.  I get very fussy over my linen closet being straightened "just so", and I am the type that can't leave a picture crooked.   I go to my friends house and start polishing their kitchen tap because I hate the soap splashes.  (Okay, maybe that soap splash thing is a bit OCD.  LOL!) 

 But I am guilty of continually fighting the stacks on my desk.  I am still getting my "in flow, out flow" of our home desk where it needs to be.  I get busy and distracted and I can fall away from our daily routines and next thing you know, the desk is a mess and someone forgot to sweep the floor, or the laundry is forgotten, and sometimes (GASP!) I even go to bed with the kitchen left in a mess!  
( I know, the kitchen one is beyond terrible and just shouldn't happen, but when you work a day job, and a business part-time, and try to keep up with family and friends, sometimes the routines slip and fatigue takes over. The punishment for that choice is there in full when your messy kitchen greets you first thing in the morning and you have to clean it before you can even start your day.)

It is a passion and life-long goal of mine to re-write these parts of my character into a person who values being organized enough to get things done. A person who won't let fatigue cause her to leave a mess where cleanliness and peacefulness should be.   I don't want to become an uptight, inflexible person, and I NEVER want to bully my family around about the housework.  I NEVER want to be remembered as the nagging Mom and Wife.  That's not worth it.

I find that when I think of myself as the person I idealize myself to be, I get more done.  If you tell yourself  "I'm a tidy person.  I don't leave my workspace a mess, and I leave the staff lunchroom spotless after I use it.", you will find yourself doing those very behaviours.

If you tell yourself "I am a clean, tidy, organized person.  I wouldn't go to bed with my clothes dumped on the floor, or I wouldn't go to bed without straightening up the house first." you just might find yourself doing more of those things.  

This is true because when there is things we would not want to be known for, we somehow shift our priorities and make it happen.  Such as looking good before you leave the house.   If you are a female reader, I am sure you can relate to a healthy sense of female pride that you don't want to go to the store in messy, stained clothes, no make-up and wild hair!  LOL!  Somehow, you just find clean clothes, a hair brush, toothpaste and all those things before going out.  It is the same with becoming a clean, tidy, organized person.  If you get on the positive side of things and tell yourself you value those things, I think you will find you get more accomplished than if you had not. 

So, as you go into your weekend, plan a few things that you want to see happen, and then affirm yourself on a job well done when you realize some of those goals.

If you are really overwhelmed and just starting out, try a website such as:


These sorts of websites have great step by step processes to help you get some wins.

We have a dinner to host on Saturday, so tonight is shopping and cleaning!

Have a fantastic weekend, and thanks for reading.

Cassie


Thursday, September 27, 2012

Organized Make Up Box

Today is a link party and a small feature on my make-up organization.

I have cleaned up my make up box.  It was time, because I dropped my box and some powders broke and flew all over the box.  I used this opportunity to clean out the old make-up, thoroughly wash the box and put everything back into place nicely.


I use a make-up box instead of a case because I can line up all my cosmetics in a neat little row.
I also tote my make-up around with me if I am running late in the morning, so a portable style make-up box is important for me.

As you can see, when the box is closed up, I place on top of the stack, the portable moisture lotion, tweezers and the wrapped up item is my eyeliner sharpener.  Even with the plastic lid, shavings still fall out of the opening where you put the pencil, so I just wrap it up to keep all shavings AWAY FROM THE REST OF MY MAKE-UP CASE.  (Can you tell this really bugs me?  LOL!)

Contents of my make up case:

1. Pressed powder
2: Eye Liner
3. Mascara
4. Blush
5. Eyeshadow
6. Concealer (rarely use this)
7. Blush brush and eyeshadow brush
8. Lip liner
9. Lip gloss
10. Small moisture lotion
11. Pencil sharpener
12. Tweezers
13. Small bottle of perfume.

Here is some of my new fav's now.


As you can see, I like a soft, natural palate. 

What does your make-up case look like?
What are the essentials to you?  I'd love to hear about your beauty routines or what you carry in your make-up case.

Post your comments below, or link your blog below.

I'm Linked up here: 


Wednesday, September 26, 2012

Make your own Disenfectant Spray

Today I am going to show you how easy and inexpensive it is to make your own disenfectant spray.

The primary use of this is for kitchen counters and sinks in my house, but I often grab a j-cloth and wander into the bathrooms at night and spray down the sinks and give the toilets a quick wipe too.

The beauty of this homemade spray is that its just water with bleach and soap.  It is completely food safe.  When washing dishes by hand, the health departments recommends a wash in hot soapy water, a primary rinse in a bleach and water solution and a secondary rinse in plain hot water.
I have also read that bleach when left to air dry basically breaks down into a salt.  This is why this solution is so very safe to use on your kitchen preparation surfaces.

Supplies:

You will need a spray bottle (Dollar Store), water, common household bleach and some liquid dish soap.
**Note: since this solution contains bleach, it can stain your clothes with bleach spots.  Use your disinfectant spray with caution.**
(I apologize some of these pictures turned out blurry.  Due to the quick pace of life in September I did not have time to re-do the photos)


First Add 1-2 Tablespoons of bleach to the bottle.  I like it close to 2 TBS, but if you find that too strong you can just add 1.


Your bottle should be about this full: 


Next add 1 tsp of liquid dish detergent.  Any brand will do.


Now that you have the bleach and soap in there, add water the rest of the way until the bottle is full.


Once you have filled the bottle, the soap will have foamed up a bit at the top like this.  It's ok, it will settle down.


Put the spray nozzle back in place and Voila!  You have a nice spray bottle of disinfectant spray you can use to make your counter tops clean as possible for each use.


Remember, you can get a separate cloth and use this same solution as part of your evening routine to wipe down your bathrooms between the regular cleanings.

Happy Cleaning,

Cassie


Monday, September 24, 2012

Canadian Thanksgiving Planning

Good Morning all my friends in the blog world.  I am mostly recovered from this head cold, and now my daughter has the cold.  I fear I am being re-infected because my sinuses are filling again.  Oh no!

My weekend was spent working and also making a messenger bag for my daughter to carry her school books in.  It is now more than half done.  I has been a very big project, and I hope within a week I am going to have a TOTALLY AWESOME blog entry for you all about the creation of this school bag.  For now you'll have to wait.  I know the suspense is just too much.  LOL!

Today my heart and mind is turned towards family plans for Thanksgiving.


 In Canada we celebrate Thanksgiving in October.  It is usually near the second wekend of October.  This year it seems like it falls early in the calendar, and I think it's just the way the days occur on the calendar.  This year Thanksgiving is on Monday October 8th.   That is now 14 days away.  This time will pass quickly.

I have been trying to connect with family for dates to get together over the last week and I am just getting my answers now.  My side of the family is going to Quebec to see my brother (My Mom and sister, not me and hubby and kids), so this year we have Thanksgiving just at my husband's side of the family.  Nice and easy schedule. :-)

If you have not yet started plannning your Thanksgiving menu and coordinating dates with family, and you live in Canada, it's time to get on this.

Organized Thanksgiving:

1. Select dates you will meet with various family and/or friends.  Get those dates onto your calendar asap!.

2. Coordinate who will participate in the food preparation.  Do you all bring some?  Does one person tend to make most of it at their house because they are hosting?

3. Write a menu.  This includes all the classic fixings:
- Turkey
- Stuffing
- Gravy - we insist on homemade and LOTS of it.
- Cranberries
- Potatoes (scalloped, or mashed, or oven roasted)
- Rice - sometimes we include rice too, but not always.
- Butternut Squash (in our house anyways)
- Vegetable or 2 more (yup, lots of veggies, it's a feast!) 
- Salad
- Buns
- Dessert.  Dessert MUST include a homemade pumpkin pie with homemade whipped cream and some vanilla ice cream on the side.  An apple pie as well or an apple crumble (a.k.a. apple brown betty) is usually around too.  At Grandma's house there is always Hello Dolly squares, Date Squares, cheese and crackers, etc.

4. Order a turkey if using a butcher. If not using a butcher, these will pop up in the freezer and cooler sections of all grocery stores starting about now.  Shop early and get the size bird you want for the price you want.  If you leave it, you get stuck with an over-sized  bird or an under-sized bird.

Do you see why North American's are renowned for napping after their turkey dinner?  LOL!  One small scoop of everything and you still have a very full plate.  The beauty of this is that you have lots of leftovers that you put into lunches for the next day or two, or you work some of those ingredients back into your family dinner, and this saves your work for the next few days in the kitchen.

The end result is a family and extended family that feels nurtured and cared for and was able to enjoy good family times together and build memories to cherish.  Ours usually includes a walk at the park.  Sometimes we collect fall leaves and decorate the dinner table with them.  Nice and rustic feeling.

Next week we will review the shopping and plan ahead  cooking for the menu.  What can be done ahead, and what needs to wait.

One last thing, as the long weekend approaches, if you have a family, you will want to plan when you can complete your weekly cleaning and shopping routines to keep yourself on track.  You can't very well send the family into the next week without the laundry caught up and lunch supplies in the house, though some of that will come from leftover turkey!  YAY!

 Sometimes it's OK to back off your routines a bit because life was busy, but you still need to plan for the parts you consider to be absolutely essential, and when you plan to squeeze those into the weekend.

Happy Planning and Happy Monday,

Cassie

Thursday, September 20, 2012

Link up Thursdays

It's Thursday, and you know that means... A link up party!


Show me what you've been up to.  I think you know I have been off-line most of this week as the cold I caught really wiped me out.

So grab a coffee and a snack and pull up a chair....post a link to your blog and share what you've been up to. 

Check back this week and next as I get back into the swing of things, post cold!

Cassie


Wednesday, September 19, 2012

Feeling sick

There won't be huge breakthroughs in the world of blogging for me this week.

I seem to have caught a sinus infection.  It came over me Monday night and I was quite concerned that I was getting sick.  By Tuesday morning I woke up with that distinct sore throat the occurs from post nasal drip.  ewww!

I went to work and suffered through, my nose actually filling more as the day wore on, not less.  By last night I was good for only lounging on the sofa and trying to feel better.  My husband even reports that last night in my sleep my nose was making terrible sounds!  LOL!

As a rule, colds are a virus, and they must pass on their own.   There are a few things we can do to help our body fight the virus and make ourselves more comfortable in the process.

1. Liquids


You must be sure to keep your liquids up.  Get clear water or clear tea, a good 5 glasses a day if you can.

2. Cold FX and/or Vitamin C


If you are concerned about a cold take Cold FX or Airborne to fight off the virus before it takes hold of you.  Vitamin C during a cold and year round is great for you.  Vitamin C is also a water soluble vitamin, so it is almost not possible to overdose on this.  You can take elevated amounts during a cold very safely.

3. Nasal Spray / cold Medicines


Over the counter medicine will ease the symptoms.  It won't really make the cold go away faster, but it can provide a bit of relief.

4. Chicken Soup


The magic of the soup is that it further hydrates you and serves as an anti-inflamatory.  Cream based soups will not serve this purpose as well as a clear broth soup, but whatever form you like it....get your soup on!

5. Add some personal comfort.


Snuggle up in bed or on the sofa with a blanket and your soup and tea, and some tissues.  Respect the time your body needs to re-coup.  Take it easy at home and make sure you get some good night's sleep.  In a little while you'll be back to your old self.

Now, in light of all that.....I am plugged up in the head, and it brings on a certain level of fatigue.  I will check in with all my friends in the blog world this week, but between my job and recovery from a cold, all the other projects will just have to wait.

Thanks for reading,

Cassie


Monday, September 17, 2012

Check up...

How are things for you?  Are you feeling the early push and strain of the fall season yet?
Are you adjusting to the rigors of the before school and after school routines in addition to your own before and after work routines?

All of our regular fall programming for the kids is not yet kicked in, and we are already feeling the pace has quickened since the summer.

Time for a check up:
Ecclesiastes 3:1 (New International Version)
There is a time for everything, and a season for every activity under heaven.

I think today's blog entry is for myself most of all.  A reminder to take at look at life and make sure things stay on track inside our little home.

As stated in the Bible verse above, there are seasons in life.  Mine is the season of participating in the parenting of two teens.   It can be a busy season.

There is a saying out there that if you aim at nothing you will most certainly hit it.   We don't want to do that with parenting, work, home care or any other part of life. 

Take 5 or 10 minutes and write down a list of top things in your life.  Mine goes something like this:

1. Faith - Spiritual nurture and health of your spirit and your family's.   A commitment to prayer, spiritual growth and living out the precepts of our faith.
2. Family - Hubby, kids, and extended family.  Making your immediate family a top priority.  Ensuring healthy relationships, good family times, and raising up good kids who are grounded in their faith and equipped with the skills they need for life.
3. Work - This one is obvious.  If you don't give your employer proper priority during work hours, you won't have a job for too long.  We all need jobs to pay our bills.  Make sure you continue to strive to raise your value in your boss' eyes.  Don't be satisfied to coast along in your job.
4. Home - Here I am referring to the upkeep and maintenance of a home.  Housekeeping, laundry, groceries, meal planning, calendar management, decorating, yard work, etc.  If the home is a mess, everything starts to unravel because this is your base, the launch pad from which you and your family enter the rest of your day.
5. Friends - Make time for friends, laughter and great memories.
6. Community - The practice of living beyond ourselves.  This opens up your world so much.  If you only live for yourself and your family, you will eventually discover that your world closes in and becomes quite limited. 

Now that I have the list of top values, these will guide the calendar for activity... calendar check up!


I can get sidetracked with many interests.  It is best to take a look at the calendar and ensure the following:
1.  That all the upcoming dates for each family member are on the calendar so that nothing is missed.
2. That activities we find on our calendar support our values.
3. That we schedule time for maintenance and for rest.  Remind yourself to find a routine that works and try your best to stick to it without being too rigid or inflexible.

I don't think any of us ever gets our list perfect.  But if we at least have a list, then we know what we're aiming for and it helps us organize our days.

We can take comfort in the fact that aligning our values and creating reasonable routines gives us a reasonable measure of peace inside.  
You'll be glad you did, and then, maybe you'll feel like this little guy:


Thanks for reading.

Cassie
 Today I am linked up here: 


Saturday, September 15, 2012

How to Hem Jeans

Here is another sewing project.  How to hem a pair of jeans.  Sometimes we find the perfect pair of jeans, but they are too long on the inseam.  (A common problem in my family).  In this case, my son, who is still growing, found a pair of jeans when we were back to school shopping and they were the colour and style he liked, and fit correctly, but were a bit too long.

No problem, Mom to the rescue!  Time to hem those jeans.

First you need to have the wearer put the jeans on with some shoes and pin the length so that the back of the jean pant is just brushing the floor at the back of the heel.
Then you will have 1 pinned jean leg, like this.


Here is another view.


Next you will want to fold the jeans over and make sure they are PERFECTLY FOLDED IN HALF.
MAKE SURE YOU PLACE PINS ON THE FOLD LINE.  SEE PICTURE BELOW.  You will need these pins later, it is a very important step. 


Look here how I ensure the pocket area is lined up too.


Next you will measure 1 1/8" from the folded line.  This is your cutting line.


Next you will mark this cutting line with tailor's chalk.  This can be bought at your local fabric store for about $2.


Look at this last picture above.   You will see the pants still folded as exactly in half as possible, and your cutting line clearly marked in tailors chalk.  The beauty of tailor's chalk is it brushes away.  There won't be any lasting marks in the fabric.

Now cut on the line you just drew.


Next you will unfold the pinned edge, flip the pants over VERY CAREFULLY TO KEEP THEM LINED UP, and cut the other side to be the same length.  Be sure to leave the pins at the fold mark so you know where you are going to fold the finished edge to.


Now you will fold and pin the pants to the fold line you left with the pins.  Simply use the distance between the cut edge and the pin marked fold line to fold in half and then in half again.


Here is the two pant edges cut together with the pin markings left for the fold line.


Here is the pant edges, fold in half and in half again to meet those pin marked lines.  Sorry this picture turned out blurry.

Once you have pinned both pant legs to match, lay them flat together.  They should look something like this: 


You can use a dark thread to hem, or buy a thread at the fabric store that is sold as a denim coloured thread made by Guiterman threads.  See my thread in this picture:


Next adjust the presser foot pressure on your sewing machine to less than normal.  I have a quilting machine and it looks like this.   See how I reduced the presser foot pressure to less than normal.  
On your machine it is the little knob at the top of your machine over the needle area.  Please check your sewing machine manual for specific directions.


Now you will sew on the inside of the jeans to stitch the hem.  It will look like this:


Stitch in a circle around each pant leg until you have 2 hemmed legs.  You will need to REALLY SLOW DOWN at the thick part of the leg seams.  If your machine is more basic, you will have to hand crank these stitches.  It is worth it to save money if you ask me. On my machine I can back off the pressure when I get to these seams if I think I need to, and I can bring it a bit closer to normal for the other parts of the hem.

Take the time to get to know what your sewing machine can do.  Most machines have A LOT of capabilities if we take the time to learn.  

Your finished jean hem should look like this:


Here is one last picture of the finished job.


There it is!  You can hem your own jeans.  If you own a sewing machine, for the simple investment of some thread and tailor's chalk, you can side step the hemming fee at a local tailor and do the job yourself for less than half the price.  Once you have the thread the chalk, future hemmings are practically for free!

Happy Hemming!

Cassie


Thursday, September 13, 2012

I'm getting my Zoom Zoom on...

It's Thursday. There is a link party at the bottom of today's entry.

We all know that cars won't last forever.
I buy used vehicles, and I tend to pick up slightly older models because it fits my budget so well when I do.

This is my old friend.  And it was my very first car ever, all my own.
A 1998 Mazda Protege LX Touring Edition, automatic transmission.


While the body of the car looks ok except for some rust at the back wheel wells, it's the harsh Canadian winters with the salted roads that rot out the underside of the vehicles here.  My car was very old by today's standards.  It was a 14 year old car.  It has served me well and got me to many places safely and comfortably.  It was 8 years old when I bought it, and I enjoyed 6 years with this car.
It was a sad day when my mechanic was reviewing all the things that needed repair due to the under side aging.  We finally hit the point that my mechanic was advising me that it would be unwise to continue to repair this car.  It has finally hit the point that more and more major things can start to go wrong and the repairs cost more than the car is worth.

So I went shopping this week and I found this.


This is my new car to get me all the places I need to be.  Once again it's an older model, it's a 2003.
A 2003, Mazda Protege 5 Hatchback, with all the nice features that come standard on these cars, and it's a manual transmission this time. 
These cars have really great reviews.  I got it for a very fair price too.

Sadly...today I will say goodbye to my old friend, but I am very grateful for that car and how reliable it was.  Now I will get to enjoy my new car and I am sure to get a few good years out of this one too.

Thursdays I offer a link up party with the hopes that others will show me what they are up to also. 
Please feel free to add a link to your blog below.
Thanks for reading.

Cassie


Wednesday, September 12, 2012

How to patch a pair of jeans

Did you ever notice that jeans today fall apart, sometimes after only a few washings!
It's really annoying.
You find something that looks great and fits great, and between the stretch fabric that most denim is made with today and all the special wash treatments that give the denim that distressed look, the garment is in a compromised state before it even leaves the store.

Our son had a very nice pair of jeans with all the wrinkles at the front pockets that make it look like they are already old, and ALL the wrinkles tore apart after only about 5 washings.  Since we bought them at store that sells name brands for less, the manufacturer would not honour any sort of warranty either.  Disappointing.  These were so bad we couldn't fix them.  The tears were too large, so we had to throw them away.

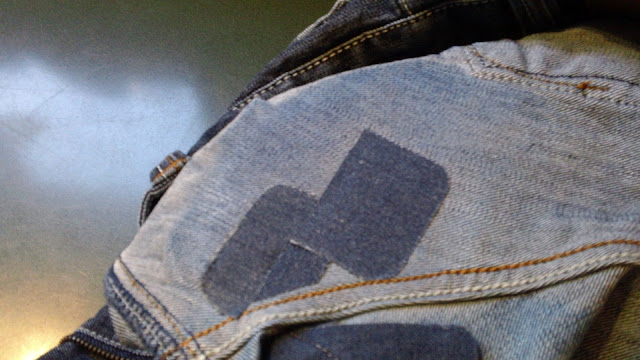
This is not always the case.  There are lots of pants that can be fixed.  Today, I am going to show you a pair of pants that need repair in the seat area, and because of where the repair is, you don't even notice it when the hubby wears the pants.  Again, these pants are fairly new, and all these cool washes just make the fabrics so weak.

Here is the pants needing repair.


You can see they have already been repaired once.   I pull them out of the dryer and discovered a new area in need of repair.  

Here is how we do the fix… 

Buy some iron on patches in denim colours at your local fabric store.

Cut the patch to a shape and size suitable to the area needing repair. 


I ended up cutting 2 patches to cover the area.  Next heat your iron and turn off the steam function.  Iron the patches into place.


Next you must duplicate this work on the inside of the pant, or it won't be strong enough.  Cut patches to cover the same repair area on the inside of the pant.  Iront those into place too. 


And for the final step, you must stitch this around the edges of the patch.  I recommend doing this from the outside of the pant.  If you don't stitch it, the patch can eventually give way in the laundry.  Stitching the edges of the patch will also further strengthen the repair.

Your finished project should look something like this. 


Now you can see that when I fold the pants, you can't see these repairs.  When my hubby will wear these jeans, the repair really isn't noticeable, unless you're the height of a toddler!  LOL!


Now you can save some money by repairing jeans too.
Supplies needed:

1. Denim in need of repair
2. Iron-on denim patches
3. Scissors to cut the patches
4. Iron and ironing board
5. Sewing machine
6. Either denim thread (yes, you can buy that) or dark coloured thread to match the pant.


Happy mending!

Cassie


Related Posts Plugin for WordPress, Blogger...