Monday, October 29, 2012

Veggie bake

I have been contemplating our family diet recently, and looking for ways to improve something that is already pretty decent.  We cook everything from scratch that we can. (okay, we do buy oven fries and the occasional ready made pizza)  For the most part, if it's for dinner, it will be home made and from scratch. Our breakfasts and lunches are quite nutritious and non-processed foods too.

A whole food, plant based diet will promote optimal health.  The thing is, most people who follow a whole food, plant based diet are Vegetarian, or Vegan.  I don't think I can do that, and I guarantee my family won't. There are a few reasons that at this time we won't decide to go completely Vegetarian or Vegan, but I will save that for another entry.
If we were all to prepare meals with the focus first on whole foods, vegetables, grains, fruits, and just leave the meats and cheeses to be used more like a garnish, our diets would become so much more rich in the things our bodies need so much, such as fibre, vitamins and minerals.

I plan to do some entries on how to organize your pantry and shopping towards an "almost Vegetarian" style of eating.  In there we will discuss processed foods and their risks etc.  For now, let's just get those veggies and whole grains and legumes, etc, out of the fridge and freezer and cupboards, and onto our plates!

Here is a Veggie Bake I made last night:


Ingredients:
8 medium sized potatoes                          1/2 sweet potato
1 medium onion chopped                         2 sticks celery, chopped
2 medium carrots, chopped                      8 Cremini mushrooms, quartered
1 medium red pepper chopped                  approx 1 cup snap peas
Olive Oil                                                   Salt and pepper to taste
1/2 tsp ground cumin                                1-2 tsp thyme
1-2  tsp oregano                                         Zest of half a lemon
1 cup water                                                1 tsp boullion broth

Pre-heat oven to 400 degrees.
First wash and chop your potatoes and add to a baking dish

Next add the sweet potato, celery and and carrots

Take your mushrooms and chop them into quarters.  I sometimes prefer this over slicing because you get to enjoy the texture of the mushroom.  If you have mushroom shy family members, slice finely instead.

 
 Add the remaining ingredients except for the red pepper and snap peas, and about 1 cup of water in the bottom of the baking dish.
This includes using a micro-plane  grater to grate lemon rind, the herbs and spices, oil (for added flavor and to prevent sticking) water, boullion, etc.
Stir this thoroughly until you have the vegetables evenly coated with the spices and oil and water. The water is for the boullion to absorb into, and it also helps to "steam" the veggies as they cook.

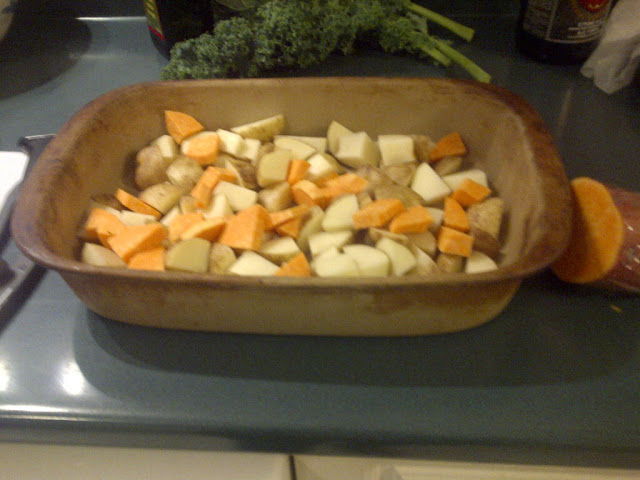
You should have a pan that looks like this, ready to go into the oven:

Bake in a 400 degree oven for about 40 min.  Stir every 10-15 minutes to ensure they cook evenly and that they don't stick.  I cover my baking dish with an upside down cookie sheet to serve as a baking dish lid for the first half of the cooking.  This helps to "steam" the veggies a bit.

For the second half of the cooking I uncover the dish, stir and keep baking.

In the last 8-10 minutes of baking, stir in the red pepper and snap peas.  This will help them keep their bright colour and crunchy texture.

Your finished baking dish should look something like this:


Last night I served this to the family with a home made Barely Risotto.  
We ate some Kale chips as an appetizer.  That was dinner!  Just right for the rainy Sunday night we had.  Lots of nutritious comfort food.

Try adding some more vegetables to you family dinner today!
Thanks for reading,

Cassie


Wednesday, October 24, 2012

MMMMM.....COOKIES!

Sometimes you just have to make some cookies!
When I was a girl, I think home baked cookies were my indulgence of choice.  This outweighed any desire for ice cream or cake...I just loved cookies.

I even had a t-shirt with one of those decals that you have to go to a t-shirt shop and get by choosing the decal from a book.  The t-shirt said "This shirt stops at all cookie jars"

So, in honour of the cookie t-shirt and fond memories of childhood baked cookies, here is my go-to recipe.  It is from the Mrs. Fields Cookie book.


Chocolate Chip Cookies 


1 Cup Butter or Margarine             2 1/2 Cups All Purpose Flour
1 Cup Brown Sugar                       1/2 Teaspoon Baking Soda
1/2 Cup White Sugar                     1/4 Teaspoon Salt
2 Large Eggs                                  2 Teaspoons Vanilla Extract
2 Cups Chocolate Chips

Method:
- Pre-heat Oven to 350 degrees.
- In a medium bowl combine dry ingredients and set aside.
- Mix together using an electric mixer the butter, brown sugar and white sugar.
- add eggs and vanilla and mix thoroughly.
- gradually stir in dry ingredients.  Be careful not to overmix, you'll toughen the flour.
- Add chocolate chips.

Distribute evenly onto baking sheet and bake for 11-13 minutes.
Cool and remove from tray.
ENJOY!

Your ingredients will look something like this:


Use an electric mixer.  Either a hand held mixer, or a stand mixer like this:


Cookies on the tray before baking:


Baked cookies look like this, time to enjoy!


Enjoy baking, and blessing your family or co-workers and friends with cookies!

Thanks for reading,

Cassie

Monday, October 22, 2012

The air in our homes

Have you ever given much thought to the air you breathe?

The air in our homes can become very stale.  This is not good for our health, nor that of the family and pets we dwell with.


In the work place, the quality of air and its temperature remains one of the comforts that employees complain about most frequently.   People often complain that it's too cold or too hot.  They will also complain with great passion that someone's perfume is too strong and will give them a headache, or that there are fumes from work being done that will make them sick.

Now consider the place we call our own castle.  Our homes.  What do you do to improve the air quality there?

I have an e-reader, and I enjoy exploring very old books free of cost, as you can download these for free.  I am pretty sure you can go to google books and download any old book to your computer too.  I have several books on housekeeping and faith issues.  My curiosity of how people approached life in the past has provided me several hours of fascinating discovery.

In some respects, people have not changed much in terms of our struggles and temptations in life.  People were trying to keep up with the proverbial Joneses 150 years ago, just like they do today.
Life styles and cultural expressions have most certainly changed though.

I discovered in several of my old books that the quality of air was as great a concern in the past as it is today.  In fact, it was probably even a greater concern.  Due to the fact that people burned fires in their homes, they were constantly fighting the soot from fires and the toxins released from burning fires.
Here is a quote from Progressive Housekeeping, written by: Catherine Owen - Copyright 1889.

"Space did not allow me, in speaking of the Monday routine to give details of the bed-room work.  It is perhaps needless to say that, on leaving the room in the morning, the windows should be thrown open, top and bottom, the pillows put on the sill to air, and the sheets also.  The mattress should be half turned over and left so until the bed is made up.  In some very, very neat houses, especially in the country, the beds are made up very early.  I have known the girls of a family to be brought up to make their beds before they leave the room.  It looks neat and nice to leave a chamber in perfect order, but it is not a healthy custom.  A bed requires at least an hour to air it.  During the night exhalations from the skin pass into the bedclothes (I am afraid to say how much of these exhalations weigh, according to science, but it is something much larger than the unscientific mind can easily take in).  If these bedclothes are thoroughly aired in the hot sun or  wind, they pass out, but this cannot happen if the bed is made up again a few minutes after occupation, the mattress, in fact, still warm from it.  This so-called very neat and tidy habit of anti-breakfast bed-making is, therefore, an unclean one.  For myself, in warm weather I think the bed of an adult should be left a couple of hours before being made up."


Here also is some mention of air quality in The Young Mother, written by: William Andrus Alcott   Copyright 1838  (4 quotes below from the chapter on ventilation of the nursery)

"Few people take sufficient pains to preserve the air in any of their apartments pure; for few know what the constitution of our atmosphere is, and in how many ways and with what ease it is rendered impure."

"In a nursery there is the mother and child, and perhaps the nurse, to render the air impure by breathing, the fire and the lamp or candle to contribute to the same result, besides several other causes not yet mentioned.  One of these is nearly related to the former.  I allude to the fact that our skins, by perspiration and by other means, are a source of much impurity to the atmosphere; a fact which will be more fully explained and illustrated in the chapter on Bathing and Cleanliness.  It is only necessary to say, in this place, that it is not the matter of perspiration alone which, issuing from the skin, render the air impure; there are other exhalations more or less constantly going off from every living body; especially from the lungs; and carbonic acid gas is even formed all over the surface of the skin, as well as by means of the lungs.
One needs no better proof that carbonic acid is formed on the surface of the body, than the fact that after the body has been closely covered all night, if you introduce a candle under the bedclothes into this confined air, it will be quickly extinguished, because there is too much carbonic acid gas there, and too little oxygen. "

"Whatever  may be the structure of the room the circumstances of the occupants, or the state of the weather, every nursery ought to be most thoroughly ventilated, once a day, at least; and when the weather is tolerable, twice a day."

and finally..."Fumigations with camphor, vinegar and other similar substances, have long been in reputation as a means of purifying the air in sick-rooms and nurseries: but they are of very little consequence.  Fresh air, if it can be had, is always better." 

Here is my musings on the matter.  I think that because we heat our homes by means of either gas, propane or electricity, and we don't burn fires all the time, and for the most part we don't use dangerous chemicals in our homes, I suspect that most of us don't give much thought to the notion of airing our homes. 

I had a co-worker who told me that his mother would once every month or so, even in the winter, turn off the heat and open EVERY WINDOW IN THE HOUSE to thoroughly air out the house for about 1 hour.  An hour would significantly cool the house.  She felt the small increase in the heating bill was far outweighed by the benefit of the fresh air in the home.

Since doing all of this reading, I must say that I now open windows every chance I get.


Between people and pets, I am sure there is lots of fresh air being used up all the time at home and at work or school, even before we add activities such as cooking or cleaning products or burning a candle because it's pretty.  The more you allow yourself the freshest air possible, the more you will quickly notice when the air is stale.

Practical steps to cleaner air: 


1. Check your furnace filter and make sure it is fresh.
2. Get your air ducts cleaned ( every 3-5 years.  depends how busy your household is)
3. Open those windows every day and let some fresh air in.  Open the kitchen window just a bit.  Enough to allow some fresh air to pass through without quickly cooling the room and causing the furnace to click on.
4. Open your bedroom windows every morning for about 15-20 min.  During this time, leave your bedding folded back in half so the mattress and pillows are exposed and can air out.  By the time you have gotten dressed and done other parts of your morning routine, you can close up the windows and make the bed.
5. Keep up with your  sweeping, dusting and vacuuming.
6. If possible, once a week open several windows on each floor of the house or in your apartment to allow as much fresh air to circulate through as possible. 

Enjoy the gift of fresh air, it can be found in any part of the world!  
Thanks for reading, and I wish you all good health.

Cassie

Saturday, October 13, 2012

Messenger Bag - Homemade

This has been a very busy week.  With the week shortened due to our Thanksgiving weekend, and then  extra work in the evenings with our printing business we operate on the side of our day jobs, there was not a lot of extra time this week.

At long last!  I am so excited to share with you the project that has taken me a month and a half to complete.  My daughter's Messenger Bag!


Yup!  there it is.  You can see one happy teenager with her new messenger bag.   All of these photos were taken with my cell phone, so the quality might not be the best.  

This bag is inspired by a bag found in the Windwaker game in the series The Legend of Zelda video games. 
The colours and the swirl pattern are an exact replica of the one found in the game.  There is a little jewel that goes between the two swirls, and we have to add that.  We painted a button gold, and we are going to attach it to the front, at the bottom, between the swirls.

There was many steps to making this bag.  You MUST be organized if you are going to sew, and this project really maxed out my thinking.  All of the pieces had the same shape of the rounded corners and squared off tops.  Some of the cutting directions were not very clear, which left me not too confident when it came to sewing, if I had all the correct pieces cut out.
 This resulted in many a night where I would sit there and read the directions for about 45 minutes trying to figure out which pieces the directions were telling me to use next, and if I sew them, what will the result be.  

Each piece has fusible fleece on the back of it, which is dreadfully expensive, so I was hesitant to just sew and then rip a seam if it was wrong.  
When you sew a dress or a skirt, it is usually pretty obvious what is the front or back of the garment.  The assembly of clothes for sewing is usually pretty straightforward. 
With this bag, since all the pieces were very similar in size and shape; even with every piece carefully numbered and organized into stacks, it was a very overwhelming project to do.

I eventually had to admit to my daughter that I was stalling on the job because I was overwhelmed.  

At least I was able to push through and now she is enjoying her bag to carry her school books every day.

Here are some more pictures of the bag:

Here you can see the detail on the back of the bag.  It has a pocket on the back that seals with velcro.  The handmade piping goes around the perimeter of the bag.


Look at the detail of the pocket panel on the inside flap.  This section alone was a week in the making because it took me forever to figure out what the directions were trying to tell me to do.  Once I figured it out, it seemed so obvious, but I had to get my head around the method the directions were trying to instruct me with. 
There are side pockets, center zipper pockets both small and large.


Here is the inside of the bag.  A zipper pocket in the inside too.
You can also see the detail of the cell phone pocket on the side.

Here is the picture of the bag.  The padded handle, all the piping and design. 


Steps to an organized sewing project:


1. Select pattern.
2. Select fabrics suitable to the project, based on the recommended fabrics described on the pattern directions. 
3. Cut out fabric, following the directions exactly.
4. Stack all pattern pieces in an organized manner.
5. Set up your sewing machine, serger (if you have one) and ironing board and iron.
6. Sew the project step by step, according to directions.  Use all notions such as interfacing, seam bindings, zippers, buttons etc. according to directions.
7. As you sew each piece, carefully fold and return the pattern piece to the envelope as soon as it is separated from the fabric so that you dont' loose any pieces.
8. Press seams as required during sewing.
9. When you have finished your project, make sure ALL of the pattern pieces are back in the envelope so that if you want to use the pattern again, all the pieces are there.  Tidy up the sewing machine and all sewing accessories.
10. ENJOY your new, finished project!

Happy Sewing!

Cassie


Tuesday, October 9, 2012

Quick Update

My friends in the blogging world....
Thanksgiving was lovely, and I have been a super busy girl for several days now.

I finished the bag I have sewn for my daughter!
All day I have wanted to post about this, and I am still working on other responsibilities at 10:30 at night.  The blog entry will just have to wait until tomorrow.

That is part of Making Your Life Organized...sometimes you can't do everything on your "to do" list realistically, and the fun stuff has to wait.  Blogging is part of my fun stuff, it has to wait.

I really hope that tomorrow I can share my sewing project with you.  Until then, thanks for stopping by.

Cassie

Wednesday, October 3, 2012

Pumpkin Pie


  Anna Olson's Pumpkin Pie

Every year an essential part of our Thanksgiving dinner and Christmas dinner is pumpkin pie with homemade whipped cream.  Anna Olson's recipe for Pumpkin Pie has become on of my most favorites.  As you prepare for your shopping this week, I thought I'd post the recipe so you can plan for the ingredients.


Courtesy of:  Anna Olson - Bake With Anna Olson - THE FOOD NETWORK

Recipe summary


I find that a whole wheat pie dough makes for a crust that browns nicely and stays crispy under the pumpkin filling, and the subtly nutty taste really works well with the autumn filling.

Makes 1 9-inch pie

Preparation time: approx 30 min, plus chilling time for dough.
Cooking time: 10 min + 35 - 40 min
Yield: 8

Ingredients

Crust

3/4 cup whole wheat flour (all-purpose)
3/4 cup cake and pastry flour
1 tablespoon sugar
1/2 teaspoon salt
10 tablespoons unsalted butter, cut into pieces and then frozen for 10 minutes
1 large egg yolk
3 tablespoons cold water
1 tablespoon lemon juice

Filling

2 cups pumpkin puree
1/2 cup packed light brown sugar
3 large eggs
3/4 cup evaporated milk
1 1/2 teaspoons finely grated fresh ginger
3/4 teaspoon ground cinnamon
1/8 teaspoon ground cloves
1/8 teaspoon salt
1 egg whisked with 2 tbsp water, for brushing

Assembly

Directions - for crust, filling and assembly.

1. Pulse the flours, sugar and salt to combine in a food processor (or the dough can be prepared by hand or using a stand mixer fitted with the paddle attachment). Add the butter and pulse it in quick pulses until just small pieces of butter are visible and the mixture as a whole just begins to take on a pale yellow colour (indicating that the butter has been worked in).
2. Stir the egg yolk, water and lemon juice together and add this to the dough all at once, pulsing until the dough barely comes together (it should look like a crumble dough). Shape the dough into a disc by hand, wrap and chill for at least 2 hours before rolling. Alternatively, the dough can be frozen for up to 3 months and thawed in the fridge before rolling.
3. On a lightly floured work surface, roll out the dough to just under a ¼ inch thick. Lightly dust a 9-inch pie plate (do not grease) and line the plate with the pastry, Trim the pastry off right to the edge of the pie plate and press it down gently to secure. Reserve any remaining dough for trim and chill it and the pie shell while preparing the filling.
4. Preheat the oven to 400 F.
5. Whisk the pumpkin purée, brown sugar and eggs together, then whisk in the evaporated milk, ginger, cinnamon, clove and salt. Pour this into the chilled pie shell.
6. To create the trim, roll out the remaining pie dough into a long rectangle and cut into strips about 1/3-inch wide. Braid three strips together, gently pulling the dough a little to stretch it as you braid it. You may have to make a few braids to cover the complete edge of the pie. Lightly brush the edge of the pie dough and place the braided dough overtop, lightly pressing. Brush the braid(s) with eggwash.
7. Place the pie onto a baking tray and bake the pie for 10 minutes at 400 F, then reduce the oven temperature to 375 F and bake the pie for another 35 to 40 minutes, until the pumpkin filling is set, but still has a little jiggle to it in the centre. Cool the pie to room temperature, then chill completely, about 4 hours, before serving.
The pie is best served chilled, and can be stored, refrigerated, for up to 2 days.

Yum!  Very delicious.  ENJOY!

Thanks for reading,

Cassie

Monday, October 1, 2012

Rustic Fall Bouquet

We had company from Australia this weekend.
My Mother is Australian, and we have LOTS of family in Melbourne and it's surrounding area.  I have never had the priveledge to go to Australia, but maybe one day I will.

We hosted a dinner for my Mom's cousin, and I knew I wanted to make a fall table centre piece.  I wanted to do it for free, and I was prepared for something a bit rustic.  It was fun to do.

First I walked the dog on Saturday morning, and I started to gather interesting pieces along the way.  Everything I gathered was on public property along the green belt that follows a creek in our neighborhood. 
I managed to get a pretty good selection by the time I was heading home.
It looks like this:

Next I found 2 glass vases in the cupboard and I started to trim the foilage and stuff them into the container a bit at a time.  I was careful to leave the flowers until last as they were quite delicate.
Here is the work part way through.


From this point I continued to stuff pieces into the vases, this way and that, and moved them around until I managed to achieve something that resembled a bouquet.
I am not a flower arranger, and I have never held myself out to be one, that is my Mother's area of skill, but she was busy and honestly, it was just plain old fun to do this.

Here is what my bouquets looked like when finished.

Here is the first one, up close:


And here is the second one.  Not as even and pretty as the first, but still unique and fresh all the same.
The last thing I did was add water to the vases.


Contents of my Rustic Fall Bouquets:

1. Red Maple Leafs (from trees along the creek)
2. Yellow Leafs (from trees along the creek)
3. Green leafs (from a bush along the creek)
4. Dried old burrs (In honour of our dog who gathers these without even trying. LOL!  I found some really cool dried bunches of burrs and took some home)
5. Purple wild flowers (creek area)
6. White wild flowers (creek area)
7. Silver dollar plant (on city property at the back of someone's house that backs onto the green belt)
8. Yellow Flowers (on city property at the back of someone's house that backs onto the green belt)  

Everything I gathered was 100% free, honest and for real and would qualify as wild or naturally growing, as I gathered it all along the greenbelt and creek area.
If you wanted to do one of these, you could have done it into a taller vase and not cut the flowers down, but i wanted mine for a dinner table, so I made mine into shorter vases.

So, if you are a Canadian, Thanksgiving is coming this weekend, you can plan for a morning walk, and a simple assembly of  wild flowers and foilage into a vase for a beautiful rustic style fall bouquet.   If you aren't Canadian but it's fall where you live, you can still do an awesome bouquet, you just don't have to worry if it will fit on your dinner table or not!  

Happy gathering and arranging!

Cassie

I'm linked here:


Related Posts Plugin for WordPress, Blogger...